MiniGP Stick HF QRP Whip Antenna Tuner + HSWR For FT-817 FT-818 ICOM 703 KX3 G1M G106
MiniGP Stick HF QRP Whip Antenna Tuner + HSWR For FT-817 FT-818 ICOM 703 KX3 G1M G106
In stock
-
All orders are dispatched the next 3 business days!
-
We will beat any price. We back all products with a 1 year guarantee.
Order in the next 0 hours 0 minutes to get it by /06/2026
Couldn't load pickup availability
Guaranteed Safe Checkout

This antenna uses a 1.5-meter tie rod as the antenna vibrator. It can work in the 60--6 meter band by tuning.
Controller power: SSB mode is recommended not to exceed 10W; CW or FT8 and other data modes are recommended not to exceed 5W to avoid damage.
With the SWR detection bridge circuit, it can be quickly and conveniently adjusted to the lowest point of SWR, and obtain good receiving effect and transmission efficiency.
Built-in balance line interface for easy loading and unloading of balance lines.
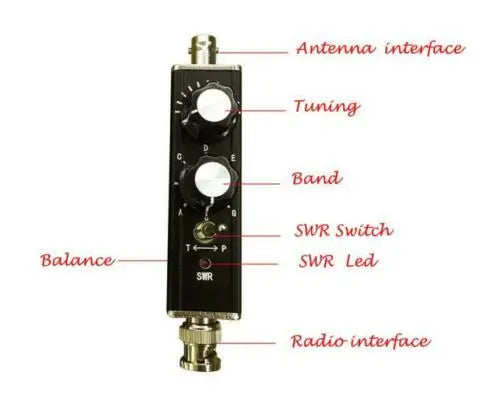
Functional diagram:

Instructions for use:
-
Connect the controller and the radio correctly, attach the lever, and pull the lever all the way.
-
Make sure the SWR detection switch is on the P side (PASS).
-
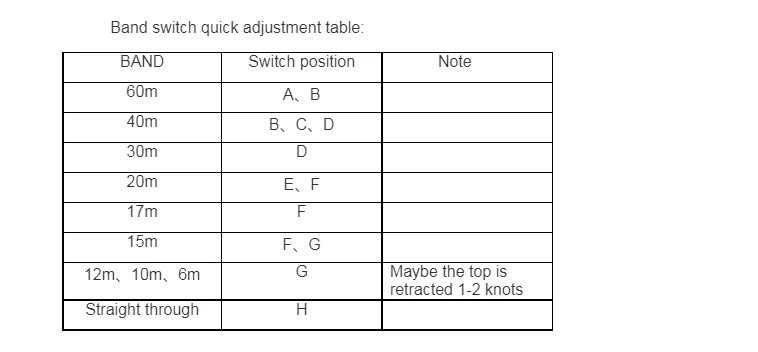
Adjust the band switch to the frequency gear that needs to work (see the attached table for approximate position, try the front and rear gears according to the vibrator condition), or adjust directly to the station with the highest receiving noise.
-
Slowly and carefully turn the tuning, listen to the radio station to receive noise changes until the noise is the most, and get good reception. This position is already near the lowest point of SWR.
If you only receive, you can skip the following steps.
-
When start communication, please be sure to insert the balance line.
-
SWRadjustment: 1, first adjust the radio's transmission power to about 3W (** remember!!! Power must not be too large, otherwise it is easy to burn the SWR detection part of the circuit **), the working mode can be switched to CW or FM mode .
2、Hit the SWR detection switch to the T side (Tune).
3、Press PTT. If the working mode is CW or FM mode, the red LED below the controller will light up; if it is SSB mode, gently yell “ah” to the microphone, the red LED will also light up; carefully adjust the top The tuning makes the LED display darkest or extinguished, at which point the SWR is the lowest.。
4、Note! Do not continuously transmit adjustments for a long time. It is recommended to use intermittent emission adjustment.
5、After the adjustment is completed, switch the SWR detection switch to the P side (PASS), and the radio switches to the desired working mode;
-
Adjust to the appropriate power and start communication.
-
After changethe band, repeat steps 2-6 above.
-
After changethe band, repeat steps 2-6 above.
Band switch quick adjustment table:
|
|
|
|
|
|
|
|
|
|
|
|
|
|
|
|
|
|
|
|
|
|
|
|
|
|
|
|
|
|
|
|
|
|
|
|


Description
Description
This antenna uses a 1.5-meter tie rod as the antenna vibrator. It can work in the 60--6 meter band by tuning.
Controller power: SSB mode is recommended not to exceed 10W; CW or FT8 and other data modes are recommended not to exceed 5W to avoid damage.
With the SWR detection bridge circuit, it can be quickly and conveniently adjusted to the lowest point of SWR, and obtain good receiving effect and transmission efficiency.
Built-in balance line interface for easy loading and unloading of balance lines.
Functional diagram:
Instructions for use:
-
Connect the controller and the radio correctly, attach the lever, and pull the lever all the way.
-
Make sure the SWR detection switch is on the P side (PASS).
-
Adjust the band switch to the frequency gear that needs to work (see the attached table for approximate position, try the front and rear gears according to the vibrator condition), or adjust directly to the station with the highest receiving noise.
-
Slowly and carefully turn the tuning, listen to the radio station to receive noise changes until the noise is the most, and get good reception. This position is already near the lowest point of SWR.
If you only receive, you can skip the following steps.
-
When start communication, please be sure to insert the balance line.
-
SWRadjustment: 1, first adjust the radio's transmission power to about 3W (** remember!!! Power must not be too large, otherwise it is easy to burn the SWR detection part of the circuit **), the working mode can be switched to CW or FM mode .
2、Hit the SWR detection switch to the T side (Tune).
3、Press PTT. If the working mode is CW or FM mode, the red LED below the controller will light up; if it is SSB mode, gently yell “ah” to the microphone, the red LED will also light up; carefully adjust the top The tuning makes the LED display darkest or extinguished, at which point the SWR is the lowest.。
4、Note! Do not continuously transmit adjustments for a long time. It is recommended to use intermittent emission adjustment.
5、After the adjustment is completed, switch the SWR detection switch to the P side (PASS), and the radio switches to the desired working mode;
-
Adjust to the appropriate power and start communication.
-
After changethe band, repeat steps 2-6 above.
-
After changethe band, repeat steps 2-6 above.
Band switch quick adjustment table:
|
|
|
|
|
|
|
|
|
|
|
|
|
|
|
|
|
|
|
|
|
|
|
|
|
|
|
|
|
|
|
|
|
|
|
|
Item Specifics
Item Specifics