
Hand-held ATS125 Radio Receiver PE5PVB ESP32-TEF6686 LW AM FM Shortwave with Antenna battery LCD
Hand-held ATS125 Radio Receiver PE5PVB ESP32-TEF6686 LW AM FM Shortwave with Antenna battery LCD
In stock
-
All orders are dispatched the next 3 business days!
-
We will beat any price. We back all products with a 1 year guarantee.
Order in the next 0 hours 0 minutes to get it by /06/2026
Couldn't load pickup availability
Guaranteed Safe Checkout
Product Introduction:
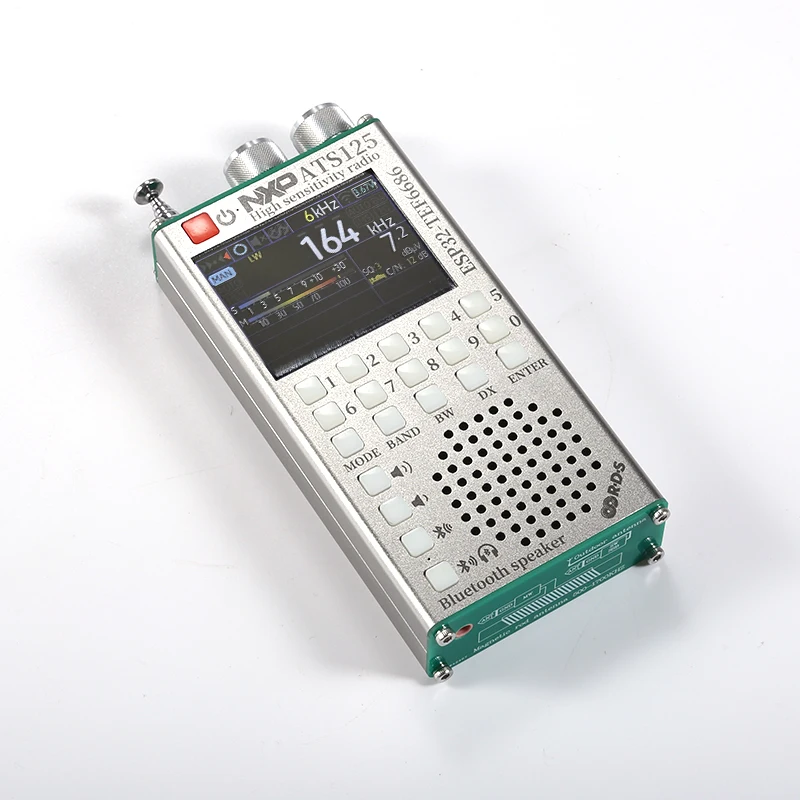
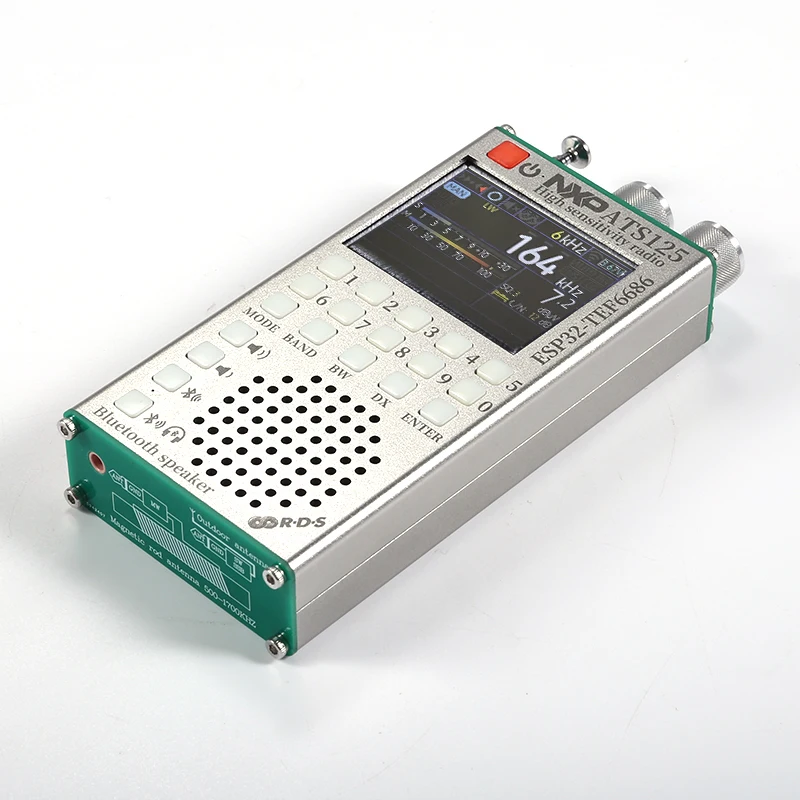
The ATS125 is the latest high-performance, high-sensitivity, and multifunctional Bluetooth version radio produced after the continuation of the ATS20/ATS25/ATS100/ATS120/ATS200 series radios. It is an open-source project based on PE5PVB, optimized and combined with the high-performance Bluetooth chip from Jerry, and integrated with the NXP high-performance automotive grade TEF6686 chip for high sensitivity and high fidelity Bluetooth function radio. It has excellent selectivity and ultra-high sensitivity. This car DSP tuner has a wide range of functions and advanced algorithms (CEQ, EMS, iMS, PACS, noise eliminator...), software defined radio signal processing, and significant advantages in multipath improvement, adjacent frequency interference, weak signal processing, and noise cancellation. The radio built on TEF6668_SSP32 not only supports listening to radio stations, but also offers rich advanced features such as almost all RDS (Radio Data System) data display, automatic/manual radio scanning, mute function, battery voltage display, variable themes, multiple languages, radio presets, and more. We have redesigned the circuit board based on the mature TEF6686 locomotive front-end receiving circuit, and selected a 2.4-inch LCD color screen with resistive touch on the basis of an open-source project; While ensuring the portability of the machine, it can display rich RDS information (RDS information requires support from local radio stations); Added a numeric keypad for users to quickly input frequencies; Equipped with a large capacity battery of 2500mAH, it supports longer usage time. In short, this portable high-sensitivity travel Bluetooth version radio hopes to meet your satisfaction! Due to the continuous optimization and updates of the firmware by both domestic and foreign enthusiasts, new features will be introduced, and the manual may have different functional differences. We apologize for any inconvenience caused.
PE5PVB project: https://github.com/PE5PVB/TEF6686_ESP32
Basic parameters:
Main control chip: ESP32-WROOM-32U
Bluetooth chip: Adopting Jieli high-performance Bluetooth transceiver chip
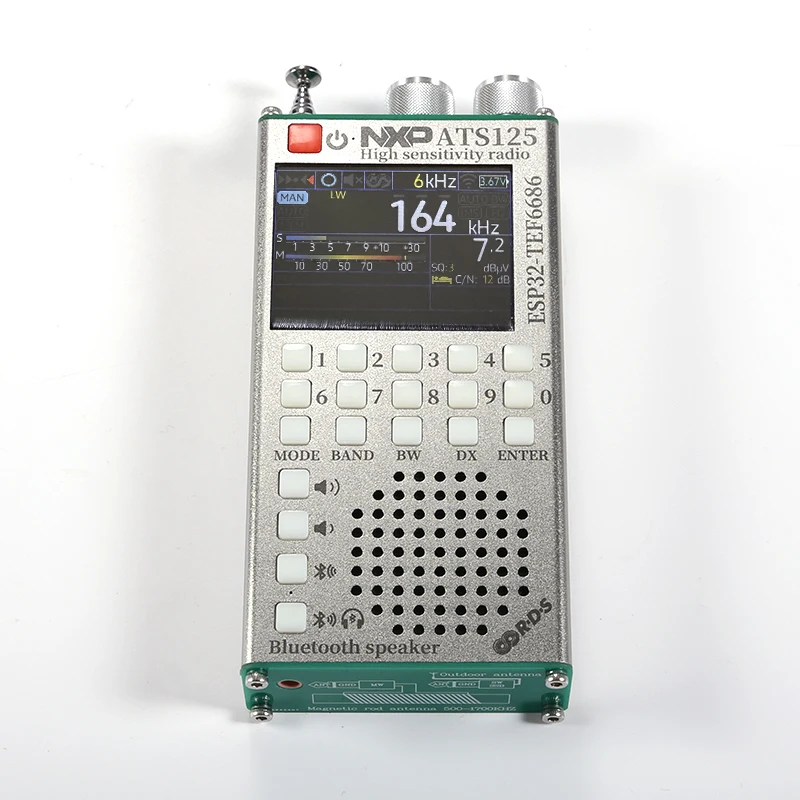
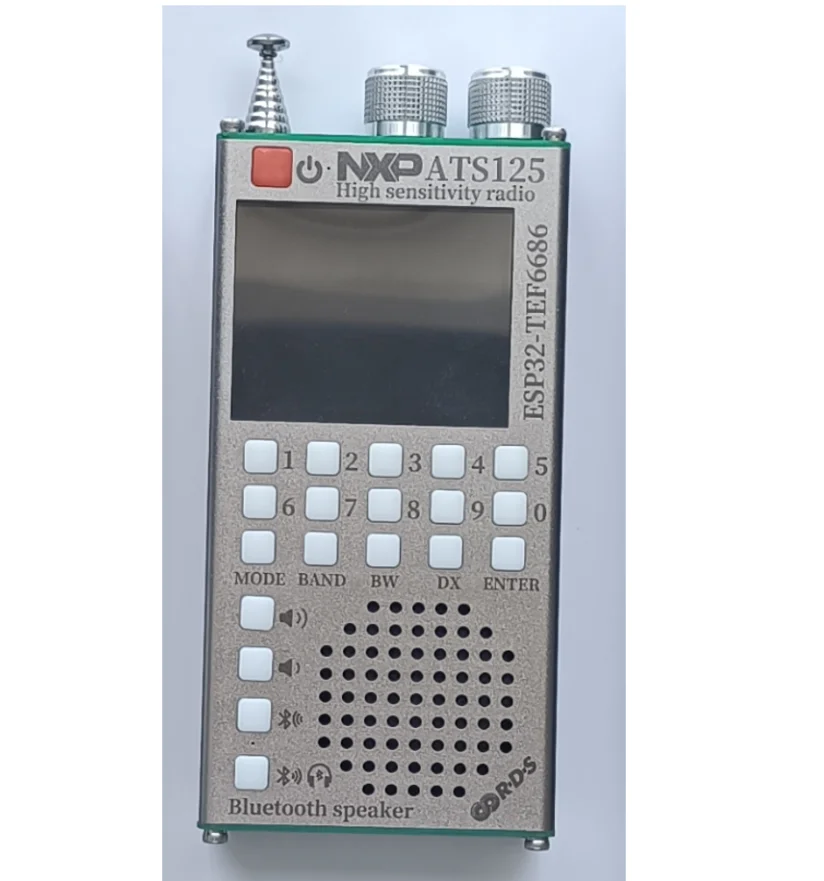
Display technology: 2.4-inch 320x240 resolution, IPS full view LCD screen with resistive touch
Control method: Default numeric keypad input and knob tuning, also supports third-party touch screen firmware
Antenna:
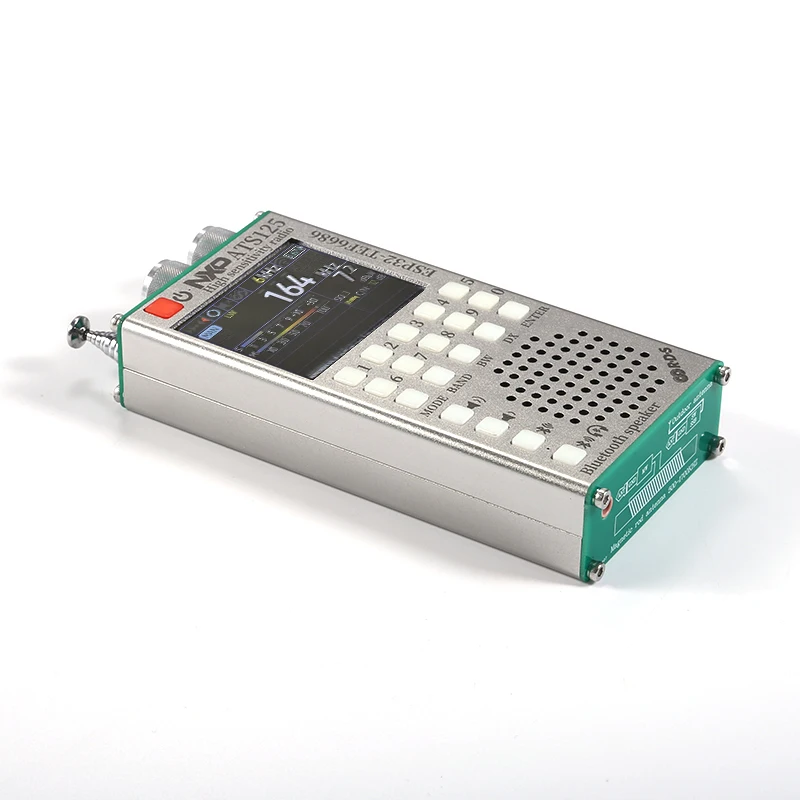
Built in 820mm ultra long rod antenna, with a 3.5mm external antenna interface at the bottom
Speaker output:
Using TI audio amplifier chip TPA6211A1, the speaker uses a 40MM long stroke full frequency speaker, with powerful bass and transparent treble.
Unique Bluetooth stereo transmission and reception function:
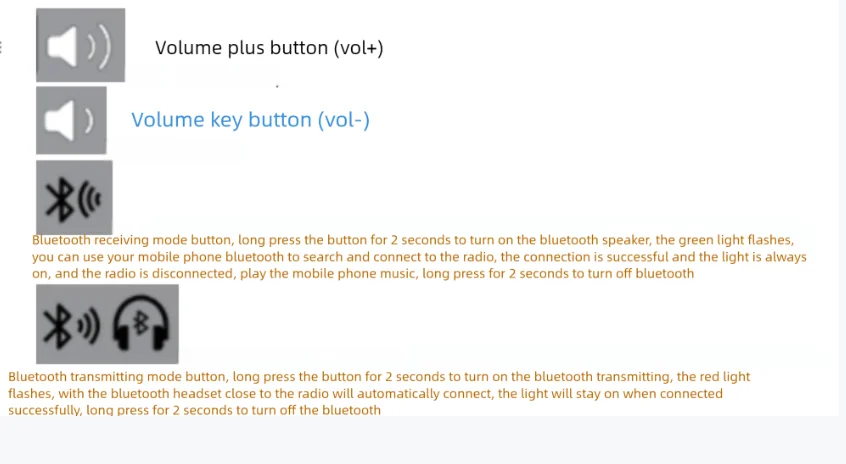
Bluetooth reception mode:
You can connect your phone to the radio via Bluetooth, and the radio can be used as a Bluetooth speaker. The 40MM long stroke full range speaker provides powerful bass and transparent treble.
Bluetooth transmission mode:
The broadcast received by the radio is transmitted via Bluetooth to Bluetooth earphones or speakers to enjoy HIFI level music.
Battery parameters:
3.7V/2500mAh, Polymer lithium battery
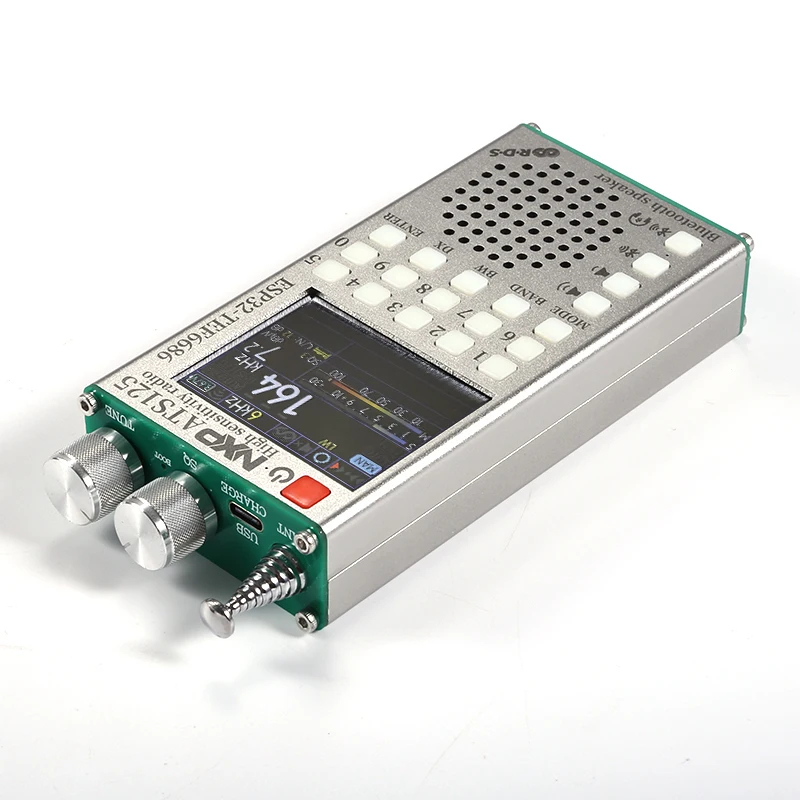
Charging interface:
TYPE-C and data upgrade interface shared
Communication interface:
Built in CH340 USB to serial chip, upgraded for external communication through TYPE-C interface
Size and weight:
The body adopts a high-precision aluminum alloy shell with a height of 120 * width of 63 * thickness of 25mm (excluding antenna joints and antennas), and the weight of the body is about 350g
Operating instructions:
Basic operations:
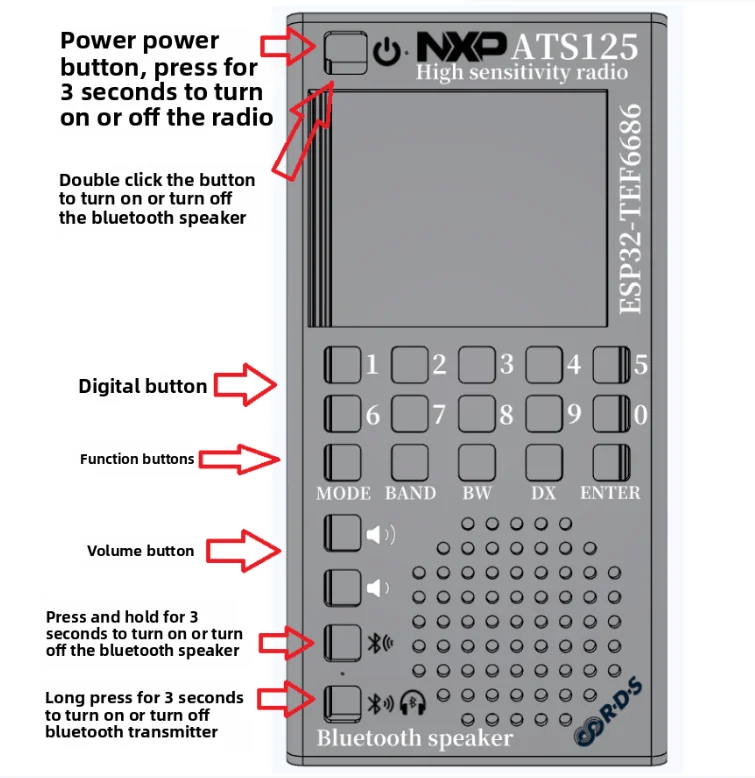
POWER button:
power button
Radio mode: Press and hold for 3 seconds to turn on or off the radio,
Listen to Bluetooth speaker mode alone: In this mode, there is no need to turn on the radio. The radio acts as a Bluetooth speaker and can be quickly pressed twice in a row (double-click the button) to turn on or off the Bluetooth speaker. In Bluetooth speaker mode, the radio will not be turned on
TUNING knob:
Rotate to adjust frequency, short press to step switch, long press to turn on iMS and EQ
SQL knob:
Static noise level adjustment
BW button: bandwidth selection
Short press in FM mode: stereo/mono switch
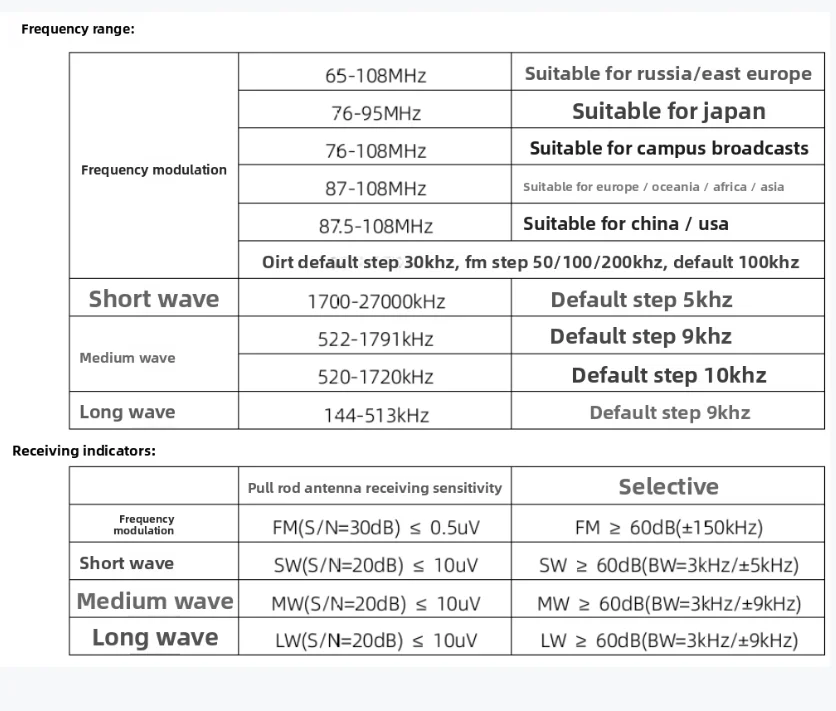
Long press in FM mode: Switch demodulation bandwidth between 56/64/72/84/97/114/133/151/168/184/200/217/236/254/287/287/311kHz/AUTO BW, or press and hold the BW button and use the TUNING knob to select. If you do not understand this parameter, please select the default AUTO BW.
Short press in AM mode: Switch demodulation bandwidth between 3/4/6/8kHz
MODE button: Adjustment mode
Short press: MAN (manual frequency modulation)/AUTO (automatic search)/MEM (storage operation) mode switch Long press: opens menu page
BAND button: band selection
Short press: band switching, switching between LW/MW/SW/OIRT/FM
Long press in FM mode: Open advanced RDS view/Alternative Frequency view
Press and hold for more than 5 seconds: sleep or turn off screen
Storage radio process:
(1) Tune to the radio station you want to store in the preset.
(2) Switch the MODE button until you see "MEM" highlighted.
(3) Press the TUNING button, and "MEM" will turn red.
(4) Select the desired storage channel. You will see colors on the preset number: red indicates that the frequency has been stored on this preset, and green indicates that there is no frequency stored on this preset.
(5) Press the TUNING button again to store the preset.
Advanced Operations:
Change encoder direction: Press and hold the BW button when turning on the device
Rotating screen: Press and hold the MODE button when turning on the device
Restore default settings: Press and hold the BW and TUNING knobs when booting up
Expand keyboard:
Number keys 0-9: Enter the corresponding frequency value
DX button: Start/Stop FMDX Scan
Enter key: Confirm input
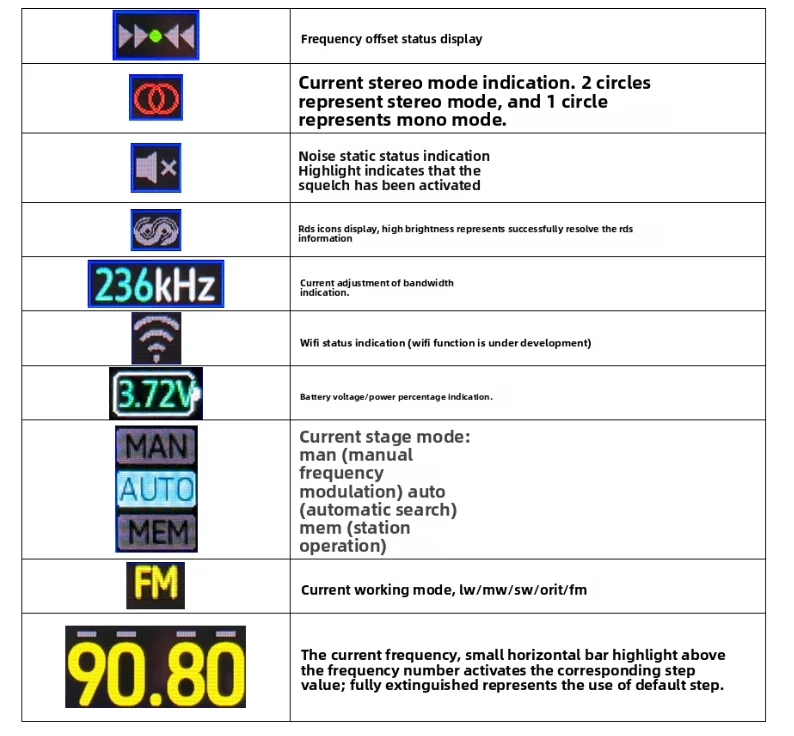
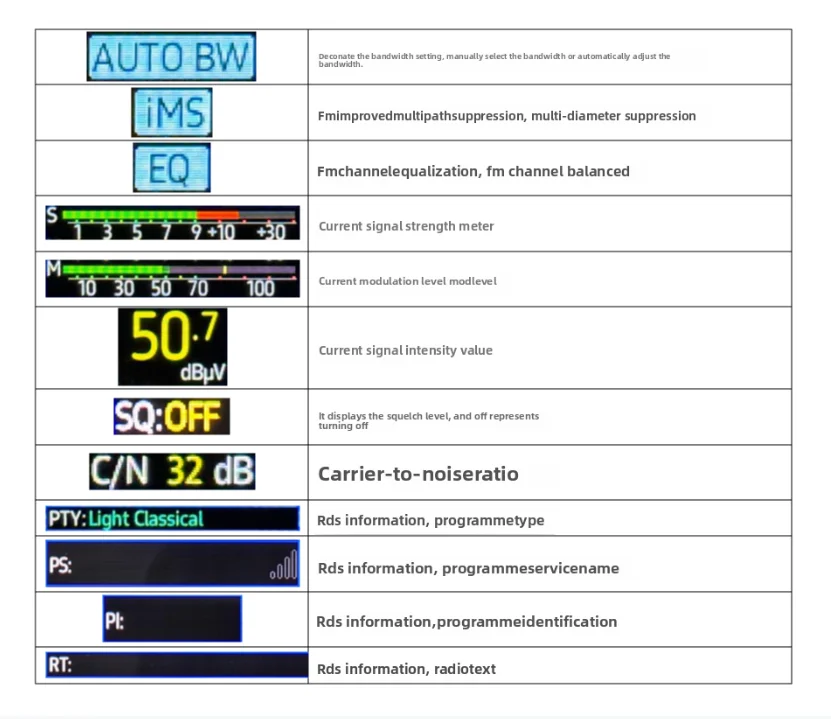
Main interface and icon meanings:
The main interface of the machine is as follows:
Menu Description:
Open menu page: Long press the MODE button
Exit menu page: Short press the MODE button
Select menu content: Rotate TUNING knob
Confirm menu content: Short press the TUNING knob
Declaration: Different versions of the program have different interfaces. Please try operating the menu yourself!
Charging instructions:
The radio is charged through the TYPE-C interface, and there is a charging indicator light hole next to the power button. Please use a charging head with a voltage of 5V and a current of 1A or higher to charge the machine. The maximum charging power is 5W and fast charging is not supported. It is recommended to turn off the device for charging. Using a radio for charging may cause interference. The charging indicator light will turn red during charging and turn off after charging is complete.
Firmware upgrade:
1. Upgrade through TYPE-C port and connect the radio to the computer using the included data cable. A new COM port will appear on the computer.
2. Press and hold the ESP32 BOOT button, then turn on the device to enter upgrade mode.
Flashing process:
1. Connect the radio to the computer using the TYPC-C data cable. A new serial port number will appear in the device manager. If not, please install the CH430N driver.
2. Press and hold the BOOT button on the radio, then press POWER to power on the radio and enter flashing mode.
3. Download and unzip the firmware, execute the flash.bat flashing script, and enter the corresponding serial port number to start flashing.
4. Wait for the flashing to end and restart the radio.
Warning:
Flashing the device carries risks, and you will be responsible for it yourself! The software version for shipment may vary, and the manual is for reference only!
Firmware Release Page:
Description
Description
Product Introduction:
The ATS125 is the latest high-performance, high-sensitivity, and multifunctional Bluetooth version radio produced after the continuation of the ATS20/ATS25/ATS100/ATS120/ATS200 series radios. It is an open-source project based on PE5PVB, optimized and combined with the high-performance Bluetooth chip from Jerry, and integrated with the NXP high-performance automotive grade TEF6686 chip for high sensitivity and high fidelity Bluetooth function radio. It has excellent selectivity and ultra-high sensitivity. This car DSP tuner has a wide range of functions and advanced algorithms (CEQ, EMS, iMS, PACS, noise eliminator...), software defined radio signal processing, and significant advantages in multipath improvement, adjacent frequency interference, weak signal processing, and noise cancellation. The radio built on TEF6668_SSP32 not only supports listening to radio stations, but also offers rich advanced features such as almost all RDS (Radio Data System) data display, automatic/manual radio scanning, mute function, battery voltage display, variable themes, multiple languages, radio presets, and more. We have redesigned the circuit board based on the mature TEF6686 locomotive front-end receiving circuit, and selected a 2.4-inch LCD color screen with resistive touch on the basis of an open-source project; While ensuring the portability of the machine, it can display rich RDS information (RDS information requires support from local radio stations); Added a numeric keypad for users to quickly input frequencies; Equipped with a large capacity battery of 2500mAH, it supports longer usage time. In short, this portable high-sensitivity travel Bluetooth version radio hopes to meet your satisfaction! Due to the continuous optimization and updates of the firmware by both domestic and foreign enthusiasts, new features will be introduced, and the manual may have different functional differences. We apologize for any inconvenience caused.
PE5PVB project: https://github.com/PE5PVB/TEF6686_ESP32
Basic parameters:
Main control chip: ESP32-WROOM-32U
Bluetooth chip: Adopting Jieli high-performance Bluetooth transceiver chip
Display technology: 2.4-inch 320x240 resolution, IPS full view LCD screen with resistive touch
Control method: Default numeric keypad input and knob tuning, also supports third-party touch screen firmware
Antenna:
Built in 820mm ultra long rod antenna, with a 3.5mm external antenna interface at the bottom
Speaker output:
Using TI audio amplifier chip TPA6211A1, the speaker uses a 40MM long stroke full frequency speaker, with powerful bass and transparent treble.
Unique Bluetooth stereo transmission and reception function:
Bluetooth reception mode:
You can connect your phone to the radio via Bluetooth, and the radio can be used as a Bluetooth speaker. The 40MM long stroke full range speaker provides powerful bass and transparent treble.
Bluetooth transmission mode:
The broadcast received by the radio is transmitted via Bluetooth to Bluetooth earphones or speakers to enjoy HIFI level music.
Battery parameters:
3.7V/2500mAh, Polymer lithium battery
Charging interface:
TYPE-C and data upgrade interface shared
Communication interface:
Built in CH340 USB to serial chip, upgraded for external communication through TYPE-C interface
Size and weight:
The body adopts a high-precision aluminum alloy shell with a height of 120 * width of 63 * thickness of 25mm (excluding antenna joints and antennas), and the weight of the body is about 350g
Operating instructions:
Basic operations:
POWER button:
power button
Radio mode: Press and hold for 3 seconds to turn on or off the radio,
Listen to Bluetooth speaker mode alone: In this mode, there is no need to turn on the radio. The radio acts as a Bluetooth speaker and can be quickly pressed twice in a row (double-click the button) to turn on or off the Bluetooth speaker. In Bluetooth speaker mode, the radio will not be turned on
TUNING knob:
Rotate to adjust frequency, short press to step switch, long press to turn on iMS and EQ
SQL knob:
Static noise level adjustment
BW button: bandwidth selection
Short press in FM mode: stereo/mono switch
Long press in FM mode: Switch demodulation bandwidth between 56/64/72/84/97/114/133/151/168/184/200/217/236/254/287/287/311kHz/AUTO BW, or press and hold the BW button and use the TUNING knob to select. If you do not understand this parameter, please select the default AUTO BW.
Short press in AM mode: Switch demodulation bandwidth between 3/4/6/8kHz
MODE button: Adjustment mode
Short press: MAN (manual frequency modulation)/AUTO (automatic search)/MEM (storage operation) mode switch Long press: opens menu page
BAND button: band selection
Short press: band switching, switching between LW/MW/SW/OIRT/FM
Long press in FM mode: Open advanced RDS view/Alternative Frequency view
Press and hold for more than 5 seconds: sleep or turn off screen
Storage radio process:
(1) Tune to the radio station you want to store in the preset.
(2) Switch the MODE button until you see "MEM" highlighted.
(3) Press the TUNING button, and "MEM" will turn red.
(4) Select the desired storage channel. You will see colors on the preset number: red indicates that the frequency has been stored on this preset, and green indicates that there is no frequency stored on this preset.
(5) Press the TUNING button again to store the preset.
Advanced Operations:
Change encoder direction: Press and hold the BW button when turning on the device
Rotating screen: Press and hold the MODE button when turning on the device
Restore default settings: Press and hold the BW and TUNING knobs when booting up
Expand keyboard:
Number keys 0-9: Enter the corresponding frequency value
DX button: Start/Stop FMDX Scan
Enter key: Confirm input
Main interface and icon meanings:
The main interface of the machine is as follows:
Menu Description:
Open menu page: Long press the MODE button
Exit menu page: Short press the MODE button
Select menu content: Rotate TUNING knob
Confirm menu content: Short press the TUNING knob
Declaration: Different versions of the program have different interfaces. Please try operating the menu yourself!
Charging instructions:
The radio is charged through the TYPE-C interface, and there is a charging indicator light hole next to the power button. Please use a charging head with a voltage of 5V and a current of 1A or higher to charge the machine. The maximum charging power is 5W and fast charging is not supported. It is recommended to turn off the device for charging. Using a radio for charging may cause interference. The charging indicator light will turn red during charging and turn off after charging is complete.
Firmware upgrade:
1. Upgrade through TYPE-C port and connect the radio to the computer using the included data cable. A new COM port will appear on the computer.
2. Press and hold the ESP32 BOOT button, then turn on the device to enter upgrade mode.
Flashing process:
1. Connect the radio to the computer using the TYPC-C data cable. A new serial port number will appear in the device manager. If not, please install the CH430N driver.
2. Press and hold the BOOT button on the radio, then press POWER to power on the radio and enter flashing mode.
3. Download and unzip the firmware, execute the flash.bat flashing script, and enter the corresponding serial port number to start flashing.
4. Wait for the flashing to end and restart the radio.
Warning:
Flashing the device carries risks, and you will be responsible for it yourself! The software version for shipment may vary, and the manual is for reference only!
Firmware Release Page:
Item Specifics
Item Specifics


