ATS125 High Sensitivity Bluetooth Radio Receiver PE5PVB ESP32-TEF6686 LW AM FM Shortwave Full Band
ATS125 High Sensitivity Bluetooth Radio Receiver PE5PVB ESP32-TEF6686 LW AM FM Shortwave Full Band
In stock
-
All orders are dispatched the next 3 business days!
-
We will beat any price. We back all products with a 1 year guarantee.
Order in the next 0 hours 0 minutes to get it by /06/2026
Couldn't load pickup availability
Guaranteed Safe Checkout
NEW ATC ATS125 High Sensitivity Multi-function Bluetooth Version Radio
PE5PVB project : https://github.com/PE5PVB/TEF6686_ESP32
Basic parameters:
Main control chip:
ESP32-WROOM-32U
Bluetooth chip:
JL high-performance Bluetooth transceiver chip is adopted
Display Technology:
2.4寸320x240 Resolution, IPS full-view LCD screen with resistive touch
Control mode:
Default numeric keypad input and knob tuning, touchscreen firmware
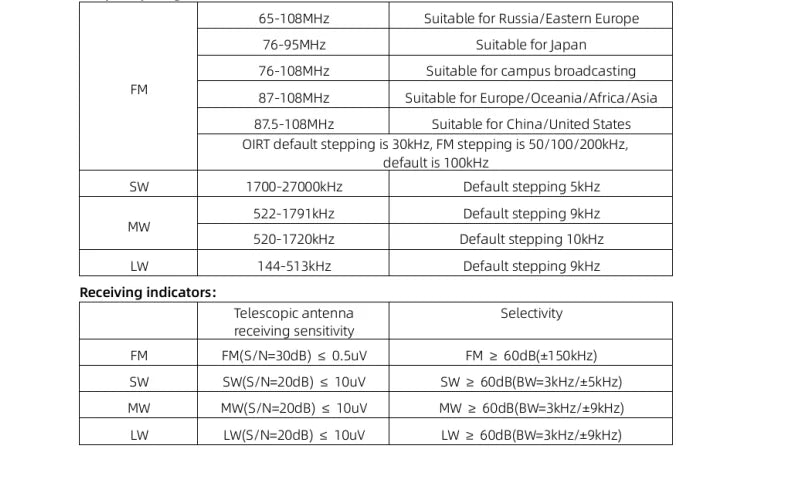
Frequency Range:

Antenna:
Built-in 820mm ultra-long tie rod antenna, and 3.5mm external antenna interface is used at the bottom
Speaker Output:
TI audio power amplifier chip is TPA6211A1, and the speaker uses a 40MM long-excursion full-range speaker, with surging bass and transparent treble.
Original Bluetooth stereo reception and transmit function:
Bluetooth Reception Mode:
You can use the mobile phone Bluetooth to connect to the radio, the radio is used as a Bluetooth speaker, 40MM long-excursion full-range speaker, the bass is surging and the treble is transparent.
Bluetooth Transmitter Mode:
The radio receives the broadcast Bluetooth transmission to the Bluetooth headset or Bluetooth speaker to enjoy HIFI level music.
Battery Parameters:
3.7V/2500mAh, polymer lithium battery
Charging port:
TYPE-C /5V/2A and data upgrade interfaces are shared
Communication upgrade interface:
BUILT-IN CH340 USB TO SERIAL PORT CHIP, EXTERNAL COMMUNICATION UPGRADE THROUGH TYPE-C INTERFACE
Dimensions & Weight:
The fuselage is made of high-precision aluminum alloy shell, with a height of 120*width, 63*thickness and 25mm (excluding antenna connectors and antennas), and the fuselage weighs about 350g
Instructions:

Basic operations:
POWER buttons:
1:Radio mode: Press and hold for 3 seconds to turn on the radio or turn off the radio,
2:Bluetooth speaker mode: In this mode, you can use the Bluetooth speaker without turning on the radio, at this time the radio can be used as a Bluetooth speaker, press 2 times in a row (double click the button 2 times) to turn on the Bluetooth speaker or turn off the Bluetooth speaker, the radio will not be turned on in Bluetooth speaker mode, saving battery time
TUNING knob:
The tuning knob on the top of the radio rotates to adjust the frequency, short press is step switching, long press is to turn on iMS and EQ, and different menu settings may have different functions
SQL knob:
Squelch level adjustment
BW Button:
Bandwidth selection
Short press in FM mode: stereo/mono switching, different settings menus may have different functions
Press and hold in FM mode: Demodulate bandwidth switching, switch between 56/64/72/84/97/114/133/151/168/184/ 200/217/236/254/287/287/311kHz/AUTO BW, you can also press and hold the BW button and use the TUNING knob to select. If you don't understand this parameter, choose the default AUTO BW.
Short press in AM mode: demodulation bandwidth switching, switching between 3/4/6/8kHz
MODE button:
Tune mode
Short press: MAN (manual frequency modulation)/AUTO (automatic search)/MEM (save table operation) mode switching Long press: Open the menu page
BAND Buttons:
Band selection
Short press: Band switching, switching between LW/MW/SW/OIRT/FM
Press and hold in FM mode: Open the advanced RDS view/Alternative Frequency view
Press and hold for more than 5 seconds: sleep or screen off, menu settings or software version have different functions
Storage Station Process:
(1)Tune in to the station you want to save in the preset.
(2)Toggle the MODE button until you see the "MEM" highlight.
(3)Press the TUNING button and "MEM" will turn red.
(4)Select the desired storage channel. You'll see a color on the preset number: red for frequencies stored on this preset, and green for no frequencies stored on this preset.
(5)Press the TUNING button again to save the preset.
Advanced Operations:
Different software versions may have different functions, which are for reference only
Modify encoder direction: Press and hold the BW button while powered on
Rotate the screen: Press and hold the MODE button while powered on
Restore Default Settings: Press and hold the BW and TUNING knobs while powered on


Menu Description:
Open the menu page: Press and hold the MODE button
To exit the menu page, press the MODE button
Select the menu content: Rotate the TUNING knob
Confirm the menu content: Press the TUNING knob
Disclaimer: The interface of different versions of the program is different, please try the menu yourself!
Charging Instructions:
The radio is charged through the TYPE-C interface, the charging current is 800ma, and there is a charging indicator hole next to the power button. Please use a charging head with a voltage of 5V and a current of 2A or above to charge the machine, and fast charging is not supported. It is recommended to turn off the charging and charging, there may be interference in charging and using the radio, the charging indicator lights up red when charging, and the light turns off after charging is completed.
Firmware Upgrade:
1. UPGRADE VIA THE TYPE-C PORT, CONNECT THE RADIO TO THE COMPUTER WITH THE INCLUDED DATA CABLE, AND A NEW COM PORT WILL APPEAR ON THE COMPUTER.
2. Press and hold the ESP32 BOOT button and turn it on again to enter upgrade mode.
Flashing process:
1. Use the TYPC-C cable to connect the radio to the computer, a new serial slogan will appear in the device manager, if not, please install the CH430N driver.
2. Press and hold the BOOT button on the radio, then press POWER to power up the radio and enter flash mode.
3. Download and decompress the firmware, execute the flash.bat flashing script, and enter the corresponding string slogan to start flashing.
4. Wait for the flashing to finish and restart the radio.
Warning: Flashing is risky, do it at your own risk! The shipped version of the software may vary, and the manual is for reference only!
Firmware release pagehttp://github.com/PE5PVB/TEF6686_ESP32/releases
Packing List:
One ATS125 radio
USB-A to TYPE-C 1 meter data cable *1
Description
Description
NEW ATC ATS125 High Sensitivity Multi-function Bluetooth Version Radio
PE5PVB project : https://github.com/PE5PVB/TEF6686_ESP32
Basic parameters:
Main control chip:
ESP32-WROOM-32U
Bluetooth chip:
JL high-performance Bluetooth transceiver chip is adopted
Display Technology:
2.4寸320x240 Resolution, IPS full-view LCD screen with resistive touch
Control mode:
Default numeric keypad input and knob tuning, touchscreen firmware
Frequency Range:
Antenna:
Built-in 820mm ultra-long tie rod antenna, and 3.5mm external antenna interface is used at the bottom
Speaker Output:
TI audio power amplifier chip is TPA6211A1, and the speaker uses a 40MM long-excursion full-range speaker, with surging bass and transparent treble.
Original Bluetooth stereo reception and transmit function:
Bluetooth Reception Mode:
You can use the mobile phone Bluetooth to connect to the radio, the radio is used as a Bluetooth speaker, 40MM long-excursion full-range speaker, the bass is surging and the treble is transparent.
Bluetooth Transmitter Mode:
The radio receives the broadcast Bluetooth transmission to the Bluetooth headset or Bluetooth speaker to enjoy HIFI level music.
Battery Parameters:
3.7V/2500mAh, polymer lithium battery
Charging port:
TYPE-C /5V/2A and data upgrade interfaces are shared
Communication upgrade interface:
BUILT-IN CH340 USB TO SERIAL PORT CHIP, EXTERNAL COMMUNICATION UPGRADE THROUGH TYPE-C INTERFACE
Dimensions & Weight:
The fuselage is made of high-precision aluminum alloy shell, with a height of 120*width, 63*thickness and 25mm (excluding antenna connectors and antennas), and the fuselage weighs about 350g
Instructions:
Basic operations:
POWER buttons:
1:Radio mode: Press and hold for 3 seconds to turn on the radio or turn off the radio,
2:Bluetooth speaker mode: In this mode, you can use the Bluetooth speaker without turning on the radio, at this time the radio can be used as a Bluetooth speaker, press 2 times in a row (double click the button 2 times) to turn on the Bluetooth speaker or turn off the Bluetooth speaker, the radio will not be turned on in Bluetooth speaker mode, saving battery time
TUNING knob:
The tuning knob on the top of the radio rotates to adjust the frequency, short press is step switching, long press is to turn on iMS and EQ, and different menu settings may have different functions
SQL knob:
Squelch level adjustment
BW Button:
Bandwidth selection
Short press in FM mode: stereo/mono switching, different settings menus may have different functions
Press and hold in FM mode: Demodulate bandwidth switching, switch between 56/64/72/84/97/114/133/151/168/184/ 200/217/236/254/287/287/311kHz/AUTO BW, you can also press and hold the BW button and use the TUNING knob to select. If you don't understand this parameter, choose the default AUTO BW.
Short press in AM mode: demodulation bandwidth switching, switching between 3/4/6/8kHz
MODE button:
Tune mode
Short press: MAN (manual frequency modulation)/AUTO (automatic search)/MEM (save table operation) mode switching Long press: Open the menu page
BAND Buttons:
Band selection
Short press: Band switching, switching between LW/MW/SW/OIRT/FM
Press and hold in FM mode: Open the advanced RDS view/Alternative Frequency view
Press and hold for more than 5 seconds: sleep or screen off, menu settings or software version have different functions
Storage Station Process:
(1)Tune in to the station you want to save in the preset.
(2)Toggle the MODE button until you see the "MEM" highlight.
(3)Press the TUNING button and "MEM" will turn red.
(4)Select the desired storage channel. You'll see a color on the preset number: red for frequencies stored on this preset, and green for no frequencies stored on this preset.
(5)Press the TUNING button again to save the preset.
Advanced Operations:
Different software versions may have different functions, which are for reference only
Modify encoder direction: Press and hold the BW button while powered on
Rotate the screen: Press and hold the MODE button while powered on
Restore Default Settings: Press and hold the BW and TUNING knobs while powered on
Menu Description:
Open the menu page: Press and hold the MODE button
To exit the menu page, press the MODE button
Select the menu content: Rotate the TUNING knob
Confirm the menu content: Press the TUNING knob
Disclaimer: The interface of different versions of the program is different, please try the menu yourself!
Charging Instructions:
The radio is charged through the TYPE-C interface, the charging current is 800ma, and there is a charging indicator hole next to the power button. Please use a charging head with a voltage of 5V and a current of 2A or above to charge the machine, and fast charging is not supported. It is recommended to turn off the charging and charging, there may be interference in charging and using the radio, the charging indicator lights up red when charging, and the light turns off after charging is completed.
Firmware Upgrade:
1. UPGRADE VIA THE TYPE-C PORT, CONNECT THE RADIO TO THE COMPUTER WITH THE INCLUDED DATA CABLE, AND A NEW COM PORT WILL APPEAR ON THE COMPUTER.
2. Press and hold the ESP32 BOOT button and turn it on again to enter upgrade mode.
Flashing process:
1. Use the TYPC-C cable to connect the radio to the computer, a new serial slogan will appear in the device manager, if not, please install the CH430N driver.
2. Press and hold the BOOT button on the radio, then press POWER to power up the radio and enter flash mode.
3. Download and decompress the firmware, execute the flash.bat flashing script, and enter the corresponding string slogan to start flashing.
4. Wait for the flashing to finish and restart the radio.
Warning: Flashing is risky, do it at your own risk! The shipped version of the software may vary, and the manual is for reference only!
Firmware release pagehttp://github.com/PE5PVB/TEF6686_ESP32/releases
Packing List:
One ATS125 radio
USB-A to TYPE-C 1 meter data cable *1
Item Specifics
Item Specifics